Showing posts with label Main Meal Recipes - Vegetarian and Fish. Show all posts

Sunday, August 29, 2010

Quick & Easy Pasta Lunch

This quick & easy pasta dish is an easy, filling lunch - perfect for those days when a sandwich is simply not enough !

This is not so much a recipe, but rather an idea of how to put together a quick and easy pasta lunch – this is ideal for those days when you’re feeling a little hungry, and when a sandwich, soup or salad just won’t cut it for you !

I always have a large bowl of cooked pasta in the fridge – I usually cook enough to last 2 days or so – as we eat a lot of pasta (& my daughter loves eating it cold as a snack !) So when I need a filling lunch in a hurry, I simply take some out of the fridge & throw this easy lunch together (with the added bonus that our generator runs between 1 pm and 2 pm, which means I can use my microwave to heat this all up !) -:


Quick & Easy Pasta Lunch

1 cup cooked Pasta Shapes (e.g. Macaroni/Penne)
½ cup Cherry Tomatoes (or large tomatoes, chopped into cubes)
handful of Rocket* (Arugula) leaves, washed & torn
28 gm (1 oz) Cheddar cheese, grated
Garlic flakes – to taste
Salt & Freshly ground Black Pepper – to taste

Place all the ingredients into a microwavable bowl, toss to blend and then heat for around 2 minutes until warmed through & the cheese has melted. (Or you can toss all the ingredients except the cheese together, and sprinkle it on top after you've heated it, if you prefer).

* Rocket (also known as Arugula) is a salad leaf with a hot, mustard/pepper taste which is typically mixed with other milder flavoured salad greens (like lettuce) in a salad to give it a nice, balanced flavour

Thursday, April 22, 2010

Fillet of Hake in a Crispy Batter

Succulent fillets of hake coated in a crispy, golden batter and served hot out of the pan

If you’ve been reading this blog for a while now, you’ll know that we don’t enjoy fish that much, so don’t eat that much of it – hence the lack of 'fishy' recipes on the blog. But, the other day I managed to find a nice box of imported frozen hake fillets in a supermarket in the city, so we decided to have a Friday night ‘fish and chips’ meal. (Hake is the lean flesh of a fish similar to cod, and is a popular fish here in Africa - especially in South Africa).

Here is the recipe for the batter which I made -: (to convert the quantities into measurements which suit you best, please scroll to the end of this page where you will see my 'Recipe Converter')


Fillet of Hake in a Crispy Batter (recipe from 'The Complete South African Cookbook' by Magdaleen Van Wyk)

4 pieces of Hake fillets (or any other fish of your choice)
120 gm Flour
2 ml (1/2 tsp) Salt
1 ml (1/4 tsp) Pepper
2 ml (1/2 tsp) Baking Powder
1 Egg, slightly beaten
250 ml (1 cup) Milk
5 ml (1 tsp) Oil

Combine the flour, salt, pepper and baking powder and stir in the milk and egg. Beat in the oil until a smooth batter is obtained. Dip the fish in the batter. Heat some oil in a frying pan to around 180’C (350’F). Place the fish into the hot oil and turn once after +- 5 to 10 minutes (depending on the thickness of the fillet of fish). Then fry for a further 5 minutes. Lift the fish out of the oil and hold suspended for about a minute to allow the excess oil to drain off. Place on a plate lined with absorbent kitchen paper. Serve hot with lemon wedges or tartare sauce.

Thursday, March 11, 2010

Upside Down Caramelised Tomato & Onion Tart

This tart is great served either hot or cold, and seems to taste even better the following day !

This is a great lunch dish and can be served either hot or cold. It does take some time to put together, but is well worth the effort.

I also like this recipe because nearly all the ingredients in it, are basic things which you usually have in your kitchen – it’s a great recipe for me, living so far away from the shops, if I suddenly hear that we have guests on the way & I need to make something nice to serve and have low food stocks ! It’s also great for vegetarians.

I have adapted the recipe slightly, and have added notes in where I have done so. (Have also adjusted the measurements for overseas readers !) I also think it might be rather nice with feta cheese crumbled over the top just before serving ….

Never mind the slightly fancy name - my 5 year old daughter simply calls this ‘Tomato Cake’ !


Upside Down Caramelised Tomato and Onion Tart (from ‘The Good Food Cookbook’ by Ina Paarman)

6 – 8 ripe red tomatoes, cut into quarters
Herb salad dressing (I used olive oil, balsamic vinegar, salt, pepper & dried basil instead)
2 Red Peppers, seeded & cut into eighths (I left these out as I did not have any)
5 medium-sized Onions, sliced into half circles
3 T (45 ml/1.5 fl oz) Butter or Olive Oil
Garlic & Herb Seasoning (I used salt & freshly ground black pepper)
¾ cup (150 gm/5 oz) Sugar (I used brown sugar)
1 T (15 ml/1/2 fl oz) Water
Shortcrust Pastry (see recipe below – which needs to be doubled)
Fresh herbs for garnishing (I used rosemary sprigs)

Preheat the oven to Gas Mark 7/425’F/220’C. Toss the tomatoes with the dressing & arrange skin side down in a non-stick roasting pan lined with baking paper. Toss the peppers in a little more dressing & add to the tomatoes. Roast for 35 – 45 minutes, until nicely browned. Remove from the oven and leave to cool. Turn the oven down to Gas Mark 6/400’F/200’C.

Sauté the onions in the butter (or olive oil), then turn the heat right down. Cover the onions with greaseproof paper as well as a lid. Cook for 20 – 25 minutes until the onions are soft & mushy. (I didn’t do this, I simply sautéed them on a low heat in an open pan) Season. Leave to cool.

In a heavy based saucepan, melt & caramelise the sugar over high heat, while shaking the pot all the time – do not stir. Add the tablespoon of water (be careful when adding the water as it might spit) to thin the syrup out a little & pour it into a 25 cm/10 inch ovenproof porcelain flan dish. Tilt the dish to coat the bottom & halfway up the sides. Arrange the cooked tomatoes (skin side down) and the peppers to cover the base of the dish in a pretty pattern. Spoon the onions over the top & smooth.

Cover the top of the pie with shortcrust pastry, making sure it is properly sealed. Trim pastry level with the edge of the dish. Bake at Gas Mark 6/400’F/200’C for 25 – 30 minutes until the pastry is crisp & golden brown. Remove from the oven & leave to stand for about 10 minutes. Turn a large round plate upside down on top of the flan dish & invert the pie on the plate. Garnish with fresh herbs, such as basil.

Serves 6 – 8

Shortcrust Pastry
(you need to double this recipe as I found this amount was just not enough to cover the tart with)

1 cup (120 gm/4.5 oz) Flour
½ tsp (2.5 ml/pinch) Salt
4 T (60 gm/2 oz) butter, at fridge temperature
1 Egg Yolk
2 T (30 ml/1 fl oz) cold Water

Sift the flour & salt twice & rub in the butter to form coarse crumbs. Mix the egg yolk with cold water & add to the flour. Cut the liquid in with a small knife to form a lumpy mixture. Use your hands to gather & knead the mixture together until it forms a ball. Don’t add more water, simply keep working the dough lightly. Wrap the dough in plastic film & leave to rest in the fridge (in cooler weather, it is best to leave out of the fridge, as it can become to hard & brittle). Roll out to 1 cm/1/2 inch thickness. Fold into thirds & roll out again to 2 mm/1/4 inch thickness on a well-floured surface, using a floured rolling pin. (This preliminary rolling makes the dough much easier to handle).

Tuesday, September 1, 2009

Spicy Chickpea & Potato Kofta's with Mango Chutney

These spicy Chickpea & Potato Kofta's make a tasty light meal or snack

Kofta’s are like meatballs and originate, I believe, in the Middle East. These Kofta’s are made with chickpeas (also called garbanzo beans) and are a great vegetarian dish. I bake mine instead of frying them, to cut down on the calories (!!), and they always turn out just as deliciously as the deep fried version.

I like to serve these Kofta’s with some mango chutney on the side. If you’d like to try my own mango chutney recipe, you can find it over here -:

Spicy Chickpea & Potato Kofta’s with Mango Chutney

2 Onions, finely chopped (I use red onions)
Butter for frying
2 cups boiled Potatoes, chopped into cubes
1 x 454 gm tin of Chickpeas (Garbanzo Beans), well drained
2 Eggs, beaten
1 tsp Baking Powder
2 tsp Mixed Spice
2 tsp Curry Powder
2 tsp dried Marjoram (or dried Mixed Herbs)
Salt & Pepper
¼ cup of Mango Chutney – to serve

Lightly fry the chopped onions in the butter until golden. Remove from heat and place in a bowl. Add the potatoes & chickpeas and mash together. Then add the eggs, baking powder, and spices/seasonings. Blend well & drop teaspoonfuls onto a lightly greased baking sheet and bake in the oven at 220’C/425’F/Gas Mark 7 for 20 minutes until done. Turn the Kofta’s over half way through, at around 10 minutes, to ensure that they are golden brown on both sides. Serve hot with Mango Chutney on the side. (These are also great eaten cold in a lunchbox the following day !) Makes +- 26.

Sunday, January 4, 2009

Tanzanian Red Snapper in a Kilimanjaro Beer Batter

The additon of Kilimanjaro lager to the batter, made this red snapper a 100% local recipe !

On our recent trip to the Tanzanian coastal town of Pangani, we were lucky enough to eat some freshly caught Red Snapper, and also to bring some home with us. We decided to cook it ‘fish & chips’ style, in a nice batter.

I think that when cooking fish in batter you have to have a really nice, light batter else the whole dish will be ruined. I always use Ainsley Harriott’s batter recipe as not only is he my favourite ‘celebrity’ cook, but I also love his recipes !

I used our locally brewed and great tasting (according to my husband, as I am not a beer drinker !) Kilimanjaro lager to make this batter. Of course I love to support local Tanzanian produce and if that weren’t enough, some of the barley used to make this lager is grown on our neighbours farm (the ones we spent Christmas day with)– I don’t think you get more local than that !


Tanzanian Red Snapper in Kilimanjaro Beer Batter (Ainsley Harriott’s Deep Fried Cod in Beer Batter, from his book “Gourmet Express”)

4 x 175 gm pieces of Cod (I used Red Snapper for this recipe)
Salt & freshly ground black Pepper
200 gm plain Flour, plus extra for dusting
½ tsp Salt
1 Egg, beaten
330 ml bottle of Beer (I used a tin of our locally produced “Kilimanjaro Premium Lager”)
Vegetable Oil, for deep frying
Lemon wedges, to garnish

Lightly season the fish & dust with the flour. Sift the flour and the salt into a large bowl. Make a well in the centre, crack the egg & gradually add the beer, stirring continuously, to make a smooth, frothy batter.

Dip the fish in the batter, making sure it is well covered, and shake off any excess. Deep-fry in hot oil for 4-5 minutes until crisp & golden. Drain on kitchen paper & serve hot, garnished with the lemon wedges.

TRY THIS : This quantity of batter is more than enough for 4 pieces of fish, so why not try dipping a few extras, such as red onion rings, to serve on the side ?

Tuesday, December 23, 2008

Red Snapper - Cooked the Tanzanian Coastal Way

Yusaf poses with the 4,5 kg Red Snapper which had been caught earlier that day

You can see how red the meat is, and what gives it the name "Red Snapper"

The beach house we stayed at in Pangani has a wonderful resident housekeeper/cook called Neema. Neema is a complete star (she missed Justin this time as there was no space for him in the car - he usually comes along with us and helps her out !) and a fantastic cook.

Whenever we are at the coast, I let Neema do all the cooking for me. Quite honestly, because it is just so darn hot and humid there is no way I can (or would even want to) stand over a hot stove on top of that with the sweat dripping – ewwwww ! Neema, who is completely used to the humid coastal weather, handles the cooking with a smile and always looking as fresh as a daisy, so I let her get on with it !

I usually just give different meat to Neema each day and ask her to cook it in Tanzanian Coastal (Swahili) style, because I love eating local food cooked by experienced local cooks and always learn a lot through the cooking methods and spices they use.

My husband & father did not have much luck on the fishing front this time, so on our last day there I sent Yusaf, the gardener, down to the local village fish market to buy us something for supper – he came back with this lovely Red Snapper, which weighed in at 4,5 kg’s. (And because I know that there are some avid fishermen reading my blog – hello all the way over there in Manchester, UK ! – I’ll add a fishing ‘news flash’ here to tell you that the fish being caught off the Tanga/Pangani coastline at this time of year are mainly Red Snapper and Kingfish, although everyone is hoping for tuna !) The Red Snapper was 4000/= Tanzanian Shillings a kilogram, which is around U$3 and prawns were selling at 20 000/= per kilogram, which is around U$15, for anyone who may be interested. (I have no clue what these items sell for in other parts of the world to use as a comparison. Anyone ?)

Anyway, I wanted to share with you the fantastic way which Neema prepared and cooked the Red Snapper for us on our last night at the beach house, cooked in one of the traditional Tanzanian coastal ways, you just can’t beat it -:


Red Snapper - Tanzanian Coastal Style

800 gm Red Snapper (or other fish) fillet, cut into chunks
1 generous tbsp fresh Ginger, grated
1 generous tbsp Fish Masala* (ground powdered mix)
1 tsp Salt
1 tsp Pepper
Flour for dusting
Oil for frying

Mix the fresh Ginger, Fish Masala, Salt and Pepper together in a bowl & place the fish chunks into this. Cover, & allow to marinade for around 4 hours in the fridge.

Heat some oil in a pan and toss the chunks of fish in a little flour before shallow frying them for a few minutes until tender & lightly browned (this should take around 5 minutes).

Serve with lemon wedges on a bed of rice, with a nice side salad and a good glass of wine !

*We can buy different spiced Masala mixes here like Pilau Masala, Fish Masala, Meat Masala etc. These are basically a combination of dried, ground spices like cumin, ginger, coriander etc blended together although each blend is slightly different. You may be able to find a ‘general’ type of Masala in your local supermarket, in which case I’m sure that you could use it as a substitute.

Tuesday, November 25, 2008

Jo's Feta & Baby Marrow Fritters

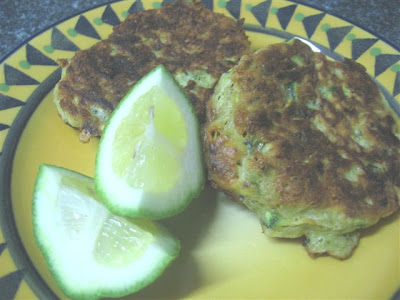
These Feta & Baby Marrow fritters are filling enough to serve as a main meal, with a nice side salad
My friend Jo over at 'Memorable Meanders' recently posted this delicious recipe for "Feta & Baby Marrow Fritters" on her blog, which she got out of the South African "Fresh Living" magazine. It looked so tasty that I just had to try it, and I'm so glad that I did - even my (fussy, carniverous) husband enjoyed them *gasp* and that's saying something, as he usually turns his nose up at all things vegetarian !

The one thing I will say about these delicious fritters, is that you simply must serve them with lime (or even lemon) wedges - as a squeeze of lime juice over them just before eating, really helps to bring all the flavours together & just makes them - extra scrumptious !

(Baby Marrows are also known as Courgettes or Zucchini.)

I've copied the recipe below, but you can view the original blog post over at Jo's blog here.


Feta & Baby Marrow Fritters (from "Fresh Living" magazine - a South African publication)

1 Cup (250 ml) Self Raising Flour
½ Tsp (3 ml) Sea Salt
3 Jumbo Eggs, beaten
½ Pkt (150 gm) Baby Marrows (also known as Courgettes or Zucchini)
1 Bunch (5-6) spring onions, chopped
1 tub (250 gm)Feta cheese, crumbled
1 Tsp (5 ml) Paprika
½ Cup (125 ml) fresh parsley, chopped
½ Cup Fresh Mint, chopped
Olive Oil for frying

Mix flour salt and eggs in a large bowl until smooth. Add remaining ingredients and mix to combine. Heat a little oil in a non-stick pan. Fry dollops of mixture until golden on both sides. Serve with lime wedges and roasted cherry tomatoes. Serves 4-6.

Friday, October 10, 2008

Mini Crustless Quiche's

You can serve these mini crustless quiche's with a side salad as a light meal - or even as a school lunchbox filler ....

Most of our visitors who come to stay with us arrive at night – especially if they arrive via air as most of the incoming international flights land here at night … and then of course there is the drive out to the farm from the airport. Which usually makes it a very late arrival on the farm indeed.

So, I almost always have a light supper of quiche and salad waiting for my guests when they arrive. I’m sure that you also have one of those standard ‘go to’ meals that you serve people on their first night in your home ? My Mum usually serves us Cottage Pie, my sister serves us Lasagne, my old Uncle Fred always used to serve us Macaroni Cheese … you know the sort of “travellers meal” I mean ?

I’ve experimented with all sorts of different quiche recipes over the years and my current favourite is a crustless version. Let’s face it, making a soft, buttery perfectly cooked pastry that isn’t raw or soggy is quite an art (not to mention a lot of work !), isn’t it ? So this one is a breeze to make.

This is also great if you follow a gluten free or low carb diet (the latter of which, is not for me – I’m a carb kind of girl, if you haven’t guessed that already from all the baking recipes I publish on here - ha !)

So, here is my own recipe for crustless quiche -:


Mini Crustless Quiche’s

6 Eggs, beaten
1 cup Ham, chopped
1 Onion, chopped & lightly cooked
1 cup Cheddar Cheese, grated
1 cup Milk
Salt & Pepper to taste

Mix all ingredients together & pour the mixture into greased muffin cups. (Fills around 10). Bake at 190’C/375’F/Gas Mark 5 for around 30 minutes until done. Allow to cool & then gently remove from cups. Serve with a crisp salad.

Thursday, September 18, 2008

Spicy Chickpea Patties

Use these Spicy Chickpea Patties in place of meat patties to make a delicious - and healthy - burger !

“Horrible things, aren’t they ?” said my carnivorous husband when I served these for lunch the other day “I thought you said you were making chick-en patties, not chick-pea patties. Egh !” I told him if he didn’t like them, and was going to complain about the food I had just (lovingly) made for him - he could hire himself a cook – ha ha !

I love the idea of making ‘burger’ type patties from chickpeas, inspired by watching one of those health programmes on TV. Just ignore my husband’s (rude) comment and try them & you’ll see, they really are quite nice – especially when served on a bread roll with lettuce, tomatoes and a bit of chutney.

This is the recipe I came up with -:


Spicy Chickpea Patties

1 ½ cups mashed Potato
½ cup Breadcrumbs
1 Egg, beaten
1 tin (240 gm drained weight) Chickpeas, drained
2 heaped tsp Coriander powder
1 tsp Cumin powder
¼ tsp Turmeric powder
1 tsp Salt
1 tsp Garlic flakes

Mix all the ingredients together & shape into patties. Place carefully on a baking tray which has been coated with non-stick spray and bake at Gas mark 6/200’C/400’F for about 30 minutes, turning once or twice during that time.
(You could also lightly pan fry them but they may break apart as the mixture is quite soft, I have not tired this yet).

Sunday, August 3, 2008

Spinach and Feta Pie

This Spinach and Feta pie is great served with a side salad as a light meal

Here is a tasty meatless dish which is really delicious and works well as a light lunch or supper, served with a side salad.

Spinach and Feta Pie

Olive Oil
600 gm’s Spinach (washed, destalked & cut into smaller pieces)
4 Spring Onions, sliced
400 gm Feta Cheese
2 Eggs, beaten
pinch grated Nutmeg
Salt & Pepper to taste
1 pkt Puff Pastry

Heat the oil in a large saucepan & lightly cook the spinach & spring onions until the spinach has wilted and the onions are translucent. Remove from pan and drain on kitchen paper (this mixture needs to be as dry as possible). Next mix the feta cheese, eggs, nutmeg, salt & pepper together, crumbling/breaking the feta cheese up as you do so. Add the spinach/onion mixture to this, & mix to blend well.

Grease a pie dish and press half the puff pastry into this (base & sides). Pour the spinach mixture into this, and then top with the other half of the puff pastry. Brush with beaten egg and bake at 180’C/350’F/Gas Mark 4 for 45 minutes to 1 hour until done.

Wednesday, July 30, 2008

The Easiest Fish Cakes You'll Ever Make !

These delicious Fish Cakes are great served with a squeeze of lemon juice

This is one of my Mum’s recipes which she got from a South African magazine (not sure which one ?) some time ago.

It really is a very simple (yet tasty !) recipe and these fish cakes can also be frozen after cooking & then simply reheated before use again.

They also make a great toddler supper 'stand-by' for busy nights & they are much healthier than any of those awful processed fish cakes you buy in the frozen food section of your local supermarket !


Easiest Fish Cakes Ever

2 slices day old white Bread
Water
500 gm Hake (or similar fish), cooked & flaked
1 Onion, chopped
1 large Egg
Salt & Pepper to taste
Finely chopped Parsley
Oil for frying

Soak the bread in enough water to completely saturate it. Mix with the remaining ingredients and shape into balls. Flatten slightly and lightly fry in heated oil until done. (This recipe serves 6.)

Thursday, May 29, 2008

East African Masala Coated Trout

The Masala coating added a nice 'bite' to the trout, and the lemon juice seemed to enhance the spicy flavours even more

We usually just have leftovers or sandwiches and a salad for lunch, and then we eat our main meal at night. Sometimes though, I will cook a light lunch instead (then we tend to eat ‘lighter’ that night).

My husband comes home for an hour’s lunch each day (the staff go off) and we sit around the wooden kitchen table as a family and eat together. It’s a really nice time and I realize how lucky we are to be able to eat together, as a family, for lunch.

Sometimes it isn’t such a peaceful scene, though … what with the dogs begging on the kitchen floor beneath our feet (“Can’t the dogs just go outside while we eat ?!” says my husband “Zonde’s breath STINKS !”) and the odd cat trying to jump onto the table (“No more cats ! We’ve got enough ! This is SO unhygenic” says husband as he scoops Tessa off the counter top just as she’s about to take off for her ‘flight’ on to the dining table - and deposits her firmly outside). Then of course there’s our daughter, feeding herself and making a great mess whilst she’s at it …whilst licking the tops of the salt and pepper shakers and trying to climb on to the table ! You get the picture ….

I had some frozen Tanzanian trout fillets in my freezer and decided to use them yesterday. So yesterday was a “light cooked lunch” day - which made for a happy husband as he’ll settle for that over a sandwich any day !

A lot of Tanzanian people, especially those who live at the coast, traditionally cook their fish in a ‘Fish Masala’ spice mix. Lightly coated, quickly pan fried and served hot and fresh to the table, you really can’t beat the taste. So I decided to try this yesterday. Only instead of Fish Masala, I used Garam Masala, as it’s what I had in the house -:


East African Masala Coated Trout

250 gm Trout Fillets
1 Egg
3 heaped tbsp Flour
3 heaped tbsp Garam Masala*
1 tsp dried Garlic flakes
1 tsp Salt
Lemon Juice to serve
Butter for frying

Beat the egg well and pour it on to a dinner plate. Mix the flour, Garam Masala*, Garlic flakes and salt together until well blended and then spread out in a thick layer on a dinner plate. Put your pan on to heat, and add a little butter to it. Then dip each fillet in the beaten egg and then quickly toss in the flour/Masala mixture.
Place immediately in the hot pan of melted butter and cook on both sides until done. Squeeze a little lemon juice over each fillet before serving with a nice side salad and some buttered bread.

*The Garam Masala (powdered) mix which I used contained Coriander seeds, Cummin seeds, Cinnamon, Cloves, Black Pepper, Ginger and Bay Leaves.

Saturday, May 17, 2008

A Recipe for Paneer Tikka Masala

This Paneer Tikka Masala dish is lovely served over plain boiled rice, with some garlic naan bread on the side

I had never tried Paneer Cheese until I came to Tanzania. We have some fantastic Indian restaurants here. Really, really good ones. Despite the fact that the meat is delivered to the front door in a plastic bag by a chap on a bicycle. Despite the fact that the restaurant has an irregular water and electricity supply. Despite the fact that the Chefs wear the same uniforms for 3 – 5 days running. Funnily enough, I have never been sick or even had so much as a slight stomach upset after eating in a restaurant like this. (Which can’t be said for some of the ‘posh’ restaurants I’ve eaten at in “first world” countries – ha !)

Anyway, back to the Paneer Cheese. It is made simply with cows milk, not aged at all and if you taste it on it’s own, uncooked, it doesn’t taste like anything. It is similar to tofu in that way, as it takes on the flavour of whatever you cook it with. It does not melt when you cook it, either. We can buy paneer easily here in most of the local shops, it is made by people in their home kitchens and supplied to the shops and there is always a ready and fresh supply of it.

Now, this recipe is one I’ve altered and developed over time. I know that most authentic Indian chefs would not agree with some of the ingredients I use (like the addition of the ground Cumin and the use of smoked Paprika) but this is just one that I’ve come up with that we enjoy eating. You could adjust the spices to suit your own taste, or just use the ones which you have available at the time.

It does take a little time to prepare and cook, but is well worth the effort. I usually make this on a day when I have a lot of time on my hands, like a Saturday afternoon. It’s one of those recipes which you just can’t rush ….

Paneer Tikka Masala

450 gm Paneer Cheese cut into cubes
½ cup Full Cream Natural Yogurt (Greek works well, too)
2 tbsp Lemon juice
1 heaped tsp Coriander powder
½ tsp Cumin powder
½ tsp Smoked Paprika powder (use plain Paprika if you don't have smoked)
½ tsp Chilli powder
1 tsp Garam Masala powder
2 tsp Garlic, crushed
2 tsp Ginger, finely grated
1 heaped tsp Salt

Mix the yogurt, lemon juice and spices together. Pour over the Paneer cubes and leave in the fridge, covered, to marinade for a few hours or overnight. Once they have been marinated, place on a baking sheet in a single layer & bake at 190’C/375’F/Gas Mark 5 for about 30 minutes until cooked (the outside of the cheese should be crisp). Turn a few times during cooking to ensure that they don’t burn & also so that they cook evenly.

While the paneer is baking, you can make the sauce -:

Oil
2 Onions, sliced
4 tsp Garlic, crushed
3 tsp Ginger, crushed
1 x 400gm tin whole peeled Tomatoes, not drained
2 tbsp Tomato Paste
¼ cup Water
Salt to taste
3 tbsp chopped Coriander leaves

Fry the onions in a little oil. Add the garlic and ginger and cook until golden. Then add the tinned tomatoes, tomato paste, water and salt to taste. Continue to cook, simmering on a low heat until the sauce thickens and the onion is soft. Add 2 tbsp of the chopped Coriander and stir. Add the baked paneer cubes, stir to blend/cover them with the sauce and cook (heat through) for a further 5 minutes.

Place in a serving dish and scatter the remaining 1 tbsp Coriander leaves over the top to garnish.

Serve with plain, boiled white rice. This dish is also great when accompanied by garlic naan bread.

Sunday, May 4, 2008

Healthy Homemade Pizza Recipe

With a few small adjustments, pizza doesn't need to be unhealthy - as this recipe for homemade pizza shows

Most people love pizza and although it is widely considered to be “unhealthy” or “junk” food, it doesn’t actually have to be. There are plently of healthy ways to make pizza in your own home.

You could use olive oil in the dough, and wholewheat flour instead of white, for example. You could have a purely vegetarian pizza and include things such as peppers, tomatoes, mushrooms, grated carrots, courgettes, onions and aubergine in your topping. If you’d like to include some meat - skip the oily salami and opt instead for lean meats such as ham or chicken. Finish your toppings off with some lovely fresh herbs (basil works well) if you have any on hand.

Most pizza’s contain a lot of oily cheese. You could substitute full fat cheese for a lower fat or fat reduced cheese and I find that you don’t actually need that much cheese on a pizza – if you use a sharp flavoured cheese (like well matured cheddar) and just sprinkle a little, evenly, over your last layer of topping it still tastes the same – and without all that extra oil, too !

Here is a lovely pizza dough recipe which results in a thin, crispy base. I have listed the toppings which I used on this particular pizza below, but you could use anything that you feel like – go crazy, experiment and enjoy creating your very own healthy pizza right in your own kitchen !


Pizza Dough

2 cups Flour (wholewheat or white)
1 tsp Salt
15 gm Yeast
½ cup tepid Water
1 tbsp Olive Oil

Sift the flour and salt into a bowl. Mix the yeast with the tepid water and add the oil. Then pour into the flour mixture. Turn the dough out of the bowl & knead until it is smooth and elastic. Place (covered) in a warm spot until it has doubled in size.

Once it has doubled in size, roll it flat into a rounded shape and place on a lightly oiled (you can use non-stick pan spray) baking sheet. Let it stand, covered, until it has doubled in size again. Then press indentations all over the dough with your fingers (take care not to press right through the dough) – this helps the topping to hold well.

Place as many toppings on the pizza as you wish. For the pizza pictured, I had very few vegetables in the house at the time, so I used (in this order) -:

Tomato Paste – spread lightly over dough
Tomato slices
Onion rings (it’s a good idea to lightly fry these beforehand)
Grated Cheddar Cheese (or use a reduced fat cheese for a healthier option)
Garlic flakes
Mixed dried Herbs
Salt & Pepper

Saturday, April 5, 2008

Thai Inspired Tanzanian Tilapia

I've used Tilapia but you could use any type of fish for this recipe. It even works well with chicken breasts !

Tilapia is another one of Tanzania’s great fishes and is exported all over the world. Growing up to 2.2 kg’s (4.4 lb’s) in size , they come from Lake Victoria which is the largest lake in Africa and the second largest freshwater lake in the world. (Lake Victoria is approximately the size of Ireland, to give you some idea of her vastness).

(Just incase you wondered if I fished for these myself, the answer is no as thank goodness our local butchery supplies them in neatly frozen portions - phew !)

Here is a simple yet tasty way in which to prepare them -:


Thai Inspired Tanzanian Tilapia

2 fillets of Tilapia
Salt & Pepper to taste
1 cm piece of Ginger, grated
4 cloves Garlic, finely sliced
Juice of 2 Limes
1 bunch Coriander (Cilantro), torn
Tin (Aluminum) Foil

Cut the foil in to 2 pieces & place a fish fillet in each piece. Pull the sides of the foil up slightly, so that the lime juice can’t run out. Season the fillets with a little salt & pepper and then scatter the ginger & garlic over them, followed by the lime juice and coriander. Seal the foil pieces to make a “pouch” around each fillet, with space for the fish to steam as it cooks.

Place the foil pouches in an ovenproof dish and bake at 180’F/350’C/Gas Mark 4 for around 15 minutes until done.

If you’d like a bit of a ‘bite’, add some freshly chopped chilli to the ginger & garlic before cooking the fish.

Alternatively, you can replace the fish fillets with chicken breasts.

Thursday, March 27, 2008

Pan-Fried Tanzanian Trout

I garnished the trout with lime wedges & served it with a simple salad

I have decided to feature local Tanzanian food products from time to time – not that we have that many, but the ones that we do have are really rather nice and it will give you an idea of what we produce in this country.

We are fortunate enough to have a trout farm between our farm and “town”. They supply the local butchery in town with fresh whole and filleted trout, and trout pate on a regular basis and as my husband was in town for the day yesterday (collecting farm chemicals) I placed a quick order to the butchery via email (Don’t you just love technology ? It even works here in the 3rd world !) and asked for some trout fillets - which they gladly provided.

I was reluctant to freeze them as they were so fresh, so decided instead to serve them for a light lunch today, with a nice fresh salad. (Usually for lunch we just have leftovers or sandwiches but seeing as my husband has been “flying solo” on the food front for the 3 weeks I was away, I thought he deserved a little treat !)

I don’t believe in adding too many seasonings and flavours to such a simple, fresh product. I believe that in this case less really is more, and I just wanted the fresh taste of the trout to come through.

I heated a saucepan and swirled some butter in that until it had melted. Then I added the fillets, flipping them once or twice until they were cooked through – it didn’t take long, not even 10 minutes. After removing them from the pan I added a squeeze of lime juice (courtesy of our lime tree in the garden) and a little salt – voila !

They were delicious, did not have an overpowering “fishy” taste, the flesh was succulent and they had relatively few bones. A winner - and I will make sure from now on that I always have
some in my freezer for quick, light meals.