Showing posts with label Baking - Cake and Loaf Recipes. Show all posts

Tuesday, October 5, 2010

A Giraffe Birthday Cake !

This giraffe cake was perfect for my son's first birthday !

He was a very happy giraffe - and tasted nice, too !


My son turned 1 in June when we were in South Africa visiting my parents, and my Mum & I made him a giraffe birthday cake together, which I’ve been meaning to post on the blog for a while now !

We used the ‘standard’ basic cake batter recipe which is a ‘fool proof’ one I got from my Mum – she used the same recipe to bake birthday cakes for my sister and I when we were kids ! (You can see the birthday cake I made for my daughter using this same recipe - when she turned 4 - over here).

Looking back on the photo’s of the cake after I’d taken them, something suddenly struck me though – an important part of the giraffe was ‘missing’ and could so easily have been added on to complete the cake. I can’t believe that I never noticed it on the day ! Can you tell what it is ? If so, leave me a comment below !

Here’s how we made our giraffe -:


Basic (Plain) Cake Batter

200 gm Margarine (or Butter)
1 ½ Sugar
5 Eggs
3 cups Flour
4 tsps Baking Powder
2 cups Milk

Cream the margarine & sugar together. Add the eggs, beating well. Add the sifted flour and baking powder, then the milk. Beat all together until well mixed & pour into 2 greased 23 cm x 23 cm (approx) round cake tins, 1 greased 30 cm x 13 cm (approx) rectangular loaf tin & 4 cup cake cases. Bake at 190’C/375’F/Gas Mark 5 for 30 - 40 minutes until a knife inserted in the centre of the cakes comes out clean. Allow to cool completely before removing from the tins/cases.


Butter Icing

1 cup butter, at room temperature
3 cups icing (confectioners) sugar, sifted
2 – 3 tbsps Milk (Optional)
Brown Food Colouring – a few drops
Yellow Food Colouring – a few drops

Cream the butter and icing sugar together. Add a couple of tablespoons of milk if you need it to be a little smoother. Place a quarter of the mixture into a separate bowl & add a few drops of brown food colouring to it, until you get the desired shade of brown. Add a few drops of yellow food colouring to the remainder of the mixture, until you have the desired shade of yellow.

To Decorate

5 – 6 strips of Liquorice (I used the ‘twisted’ kind)
2 brown Lollipops

How To Assemble Your Giraffe:

Get a stiff, covered board long enough for your giraffe to fit on to (we used a short wooden shelf covered with foil !) First, take the 2 round cakes & position them to make your giraffe’s head and body. Next, cut the cake from the loaf tin to size to make your giraffe’s neck. Use 2 of the cupcakes to make his ears, and the remaining 2 to make his feet.

Ice everything with yellow icing, and then use the brown icing to make ‘spots’ on your giraffe’s body and neck, and on his ears.

Now position 2 liquorice strands between the body and feet portions to create the legs. Use some more of the liquorice to make his mouth, eyes & nostrils and place the 2 lollipops on his head to make the ‘horns’.

Voila - a giraffe is born !

Sunday, August 1, 2010

Honey Cake - Light & Delicious !

This honey cake is delicious served with tea, or as a dessert with whipped cream or custard .....

This is a lovely, light cake which tastes delicious served either on it’s own with a nice cuppa tea, or for dessert with whipped cream or custard.

I was tempted to add some mixed spices to the batter when I made this recipe for the first time – but I honestly don’t think it needs it. The honey topping is subtle, with just a hint of lemon flavour – so don’t let the addition of the lemon juice put you off (as it did me – I immediately thought ‘cough cure !’ but I can assure you that it doesn’t taste like that at all !)


Honey Cake (from the book ‘ Cook and Enjoy It’ by S.J.A. de Villiers – wording for ‘method’ changed slightly)

Cake Mix:
1 cup Flour
½ cup Sugar
4 tsp Baking Powder
¼ tsp Salt
½ cup Milk
3 tbsp Butter
1 Egg

Cake Topping:
3 tbsp Honey*
1 ½ tbsp Butter
1 tbsp Lemon Juice

Sift together the flour, sugar, baking powder and salt. Heat the milk and butter in a small saucepan until lukewarm, beat in the egg & add to the sifted dry ingredients, blending well. Turn the batter into a greased, round pie dish or cake tin (approx 21 cm/9 inch in size) & bake at 180’C/350’F/Gas Mark 4 for 15 to 20 minutes until a skewer inserted in the middle comes out clean. Place the honey, butter and lemon juice into a small saucepan and melt together over a gentle heat. Pour over the hot cake as soon as it comes out of the oven.

*The recipe states that you can also use Syrup in place of honey – which I guess would then make it a Syrup Cake ?!

Friday, July 16, 2010

Quick Coffee Cake (with a Biscuit-y Topping)

The crumbly, biscuit-y topping on this cake makes for a nice change from your typical icing/frosting

This is an unusual cake recipe in that it has a crumbly, biscuit-y topping which actually makes a nice change to your typical iced/frosted cake – especially if you are not a fan of very sweet things !

The biscuit-y topping contains a nice mix of cinnamon and brown sugar, but I have also substituted the cinnamon powder for instant coffee powder or mixed spice before, and both taste equally delicious.

This recipe comes from one of my recipe books which is 81 years old (!!) & I’m pretty sure that it tastes every bit as good as it did all those years ago !


Quick Coffee Cake (from ‘Anyone Can Bake’, Standard Brands Inc, published 1929)

Cake/Base:
2 cups Flour
½ tsp Salt
3 tbsp Sugar
4 tsp Baking Powder (Baking Soda)
2 tbsp Butter, melted
1 cup Milk

Sift the flour, salt, sugar & baking powder together in a bowl. Stir in the melted butter & milk and mix to form a stiff batter. Spread into a round lightly greased 23 cm/ 9 inch cake tin.

Topping:
3 tbsp Flour
1 tbsp Cinnamon
3 tbsp brown Sugar
3 tbsp Butter

Sift the flour, cinnamon & sugar together. Rub in the butter until the mixture has a sandy texture. Sprinkle over the top of the batter before baking (no need to pat down).

Bake at 200’C/400’F/Gas Mark 6 for 30 to 40 minutes until done.

Monday, April 26, 2010

5 Minute Chocolate Microwave Mug Cake

I know that this recipe has been doing the internet/email/chain letter rounds for years now, but it was the first time I'd tried it and it worked so well that I thought I'd put it on the blog for those of you who perhaps haven't seen it before. I made it with my daughter during the (current) school holidays - it's a great, fun, easy recipe for kids to make (with adults supervision, of course !) - especially for those times when they say 'I'm b-o-r-e-d !!!!'

Firstly, grab yourself a tall coffee mug & inside this put 4 tablespoons of flour (not self-raising), 4 tablespoons of sugar & 2 tablespoons of (unsweetened) Cocoa powder. Mix well (as demonstrated by my 5 year old daughter above !)

Into this, crack 1 egg and add 3 tablespoons of milk, 3 tablespoons of (sunflower) oil & a dash of vanilla essence. Mix well to blend, as you see in the picture below .....
Place the mug in the microwave, and microwave (1000 watt power) for 3 1/2 to 4 minutes until done. I was warned that the cake might rise over the surface of the mug(depsite there not being any raising aid - like baking powder - in the ingredients), but this didn't happen - maybe because I used a really tall mug ? The finished product looks like this -:

And here is a close-up, after the cake has been tipped out of the mug -:

This is a very moist cake - I would liken it to a chocolate sponge pudding, and would probably serve it as such with some fresh cream or custard. It serves 2 big (or 3 little) people generously and is DELICIOUS !

If you haven't tried this easy peasy recipe before, especially if you have (bored !) children in the house - I urge you to give it a try. You won't be disappointed !

Sunday, April 18, 2010

Vanilla Sponge with Feather Icing

First, pipe vertical lines on to the white iced surface of the cake (above)


Next, draw 'invisible' horizontal lines with a knife over the piped red lines (as above) to create a 'feathered' effect


Once the icing has set, cut the cake in to squares ... and enjoy !


Nothing beats a simple Vanilla Sponge and instead of making my usual round, plain iced cake I decided to make a square cake the other day for a change, and ice it with ‘feather icing’ which is an icing style I learnt from one of my childhood cook books when I was around 7 years old, growing up in then Rhodesia.

I remember my Mum baking the cake (with my sister and I ‘helping’) and her giving us the job of mixing the icing with her supervision. As the oldest child, I was allowed to actually do the ‘feathering’ and I remember always being quite proud of the end result !

Anyway, it’s been years since I’d tried this feather icing and it did not turn out as ‘feathery’ as it should – in hindsight, the pink icing mix should have been a bit runnier – but I decided to post the photo’s and the method anyway, as I like sharing even my ‘not-so-perfect’ kitchen adventures with you too as at the end of the day, that’s what cooking and baking is really all about, isn’t it ?


Vanilla Sponge

100 gm Margarine
¾ cup Sugar
3 Eggs, beaten
1 ½ cups Flour
2 tsp Baking Powder
¾ cup Milk
1 tsp Vanilla Extract

Cream the margarine & sugar together until light and fluffy. Add the eggs and beat well. Sift the flour and baking powder into the mixture. Add the milk & Vanilla extract and beat.

Pour into a greased square cake tin (approximately 21 cm x 24 cm/8 inch x 9.5 inch) and bake at 180’C/350’F/Gas Mark 4 for 20 to 30 minutes until a skewer inserted in the center comes out clean.

Feather Icing (Frosting)

500 gm pkt Icing Sugar
4 - 6 tbsps Cold Water
Few drops of pink Food Colouring

Sift the icing sugar into a bowl and make a well in the centre. Pour a couple of tablespoons of the water into this. Mix together with a metal spoon, slowly adding more water as needed, to form a smooth, easily spreadable icing that is not too runny. Remove around 3 – 4 tablespoons of this mixture and place it in a separate bowl, adding the food colouring to this to make a pink icing (which should be slightly runnier than the white icing is).

Now spread the white icing over the cooled cake & place the pink icing into a piping bag (I simply use a clean plastic bag with one corner just cut off slightly). Pipe the pink icing in straight vertical lines across the surface of the white icing, about 2 cm (approx. 1 inch) apart. Then take a clean, sharp knife and gently draw ‘invisible’ lines across the surface of the icing horizontally at about 2 cm (approx. 1 inch) intervals – this will ‘feather’ the pink icing lines and create a pretty effect. Allow to set slightly before cutting the cake in to squares and serving.

Saturday, April 10, 2010

Gingerbread Squares

A freshly baked tray of Gingerbread Squares - hot out of the oven ....

This is a light, spicy gingerbread which is great cut into large squares for lunchboxes, afternoon tea or even served with custard or ice cream for pudding ! I have made a few changes to the original recipe (which I have noted in brackets below).

As always, if you need to convert the recipe quantities into ones which work for you, then you can scroll to the bottom of this page and click on the ‘Conversion Calculator’.

I also have another (egg free) recipe on the blog for a denser Gingerbread (which is more like a Ginger Loaf) which you can find over here.

Piled high on a plate, these are just the thing to enjoy with a nice cuppa tea !

Gingerbread Squares (from ‘The Complete South African Cookbook’ by Magdaleen Van Wyk)

170 gm Butter (or Margarine)
110 gm Sugar (I use brown sugar)
110 g Treacle (or Syrup)
450 gm Cake Flour
2 ml Salt
10 ml ground Ginger (I use 15 ml ground Ginger & also add 5 ml ground Nutmeg & 5 ml ground Mixed Spices)
2 Eggs, beaten
5 ml Bicarbonate of Soda dissolved in 50 ml Hot Water
Decoration: (Optional)
blanched, split almonds

Heat the butter (or margarine), sugar and treacle (or syrup) in a saucepan over medium heat until the sugar dissolves. Remove from the stove and allow to cool. Meanwhile, combine the flour, salt and ginger (& other spices, if using) in a mixing bowl. Stir the melted sugar mixture into the flour, mixing well, then stir in the beaten eggs and blend thoroughly. Stir in the dissolved bicarbonate of soda and pour the mixture into a greased and lined 220 mm square baking tin (I used a 27 ½ cm x 21 cm tin – this is around 11’’ x 8 ½ ‘’). Arrange almonds on top and bake in centre of the oven at 180’C/350’F/Gas Mark 4 until firm, about 1 hour. Remove from oven, allow to cool slightly in the tin, then cut into squares, remove from the tin and cool thoroughly on a wire rack.

Sunday, March 7, 2010

Deliciously Tasty Peanut Butter Bread

Great eaten on it's own fresh from the oven - or with a filling ... or even toasted - this recipe for Peanut Butter bread is a winner all round !

This peanut butter bread is more like a cake-y bread than a bread, if you know what I mean ! I’ve been making it recently to put in my daughter’s school lunchbox – she likes it plain but you could also add fillings such as jam or cheese. It’s also great toasted for breakfast !


Peanut Butter Bread (from ‘Cook and Enjoy It’ by S.J.A. de Villers)

500 ml (2 cups) Cake Flour, sifted
125 ml (1/2 cups) Sugar
10 ml (2 tsps) Baking Powder
5 ml (1 tsp) Salt
190 ml (3/4 cup) Smooth Peanut Butter*
1 Egg, well beaten
190 – 250 ml (3/4 to 1 cup) Milk

Preheat the oven to 180’C/350'F/Gas Mark 4 and grease a small loaf tin in advance. Sift together the flour, sugar, baking powder and salt. Blend the peanut butter with the dry ingredients using a fork. Blend in the egg, still using a fork. Add the milk, mix well and turn the mixture into the tin. Bake for 50 to 60 minutes. Slice and butter.

* I used crunchy Peanut Butter along with a large handful of roughly chopped pean
uts

Wednesday, November 4, 2009

Easy Vanilla Cupcakes with Chocolate Frosting

I let my daughter choose which type of topping she'd like to make with me for these easy vanilla cupcakes - and she chose chocolate ... mmmmm !

Last week I baked some cupcakes for tea. It’s always a novelty for me baking in South Africa as the flour and sugar is so clean here and only ever has to be sifted once. At home in Tanzania, we usually have to pick tiny stones out of the sugar & sift the flour at least twice to get rid of all the ‘dudu’s’ ('dudu's' are insects in the local Swahili language). All the flour I buy contains small insects and/or funny bits and pieces of unknown animal life ! “OH YUCK !” I hear you say …………. but ‘tis the truth & if a few insects happen to miss my beady eye and fall through the sieve then I reckon it’s all baked at a high temperature so should kill all the germs anyway. (And none of us have ever got sick or anything so it must be okay !)

Another novelty – being able to buy and bake with Vanilla Extract. Not that cheap 'n nasty essence-y stuff. Not to mention real, fresh butter. Ahhhh ….. Also, being able to lick the batter straight from the bowl as the eggs here are pasteurized. How daring ! I don’t risk this at home (although my daughter has - and survived to tell the tale !) unless I’m in a particularly daring mood that day (ha ha – the daredevil life of a farmer’s wife, ‘eh ?!)

So – here then is a recipe for the cupcakes I made here last week. (And yes, I did lick the bowl … and the spoons, too !) -:


Easy Vanilla Cupcakes with Chocolate Frosting

1 ½ cups Cake Flour
¾ cup White Sugar
2 tsp Baking Powder
½ tsp Salt
½ cup Milk (I used Skim Milk)
½ cup Sunflower Oil
2 Eggs, beaten
1 tsp Vanilla Extract
Butter or Margarine for greasing the cake cups/pans

Sift the flour, sugar, baking powder & salt together. Make a well in the centre and add the milk, oil, beaten eggs and vanilla extract. Blend all together and beat for a few minutes (I used a hand held whisk) until well blended and creamy. Place mixture into lightly greased cake or muffin cups, and bake at 180’C/350’C/Gas Mark 4 for 12-15 mins until a skewer inserted in the middle of one of the cupcakes comes out clean. Cool on a wire rack before icing them with a topping of your choice. Makes about 20 cupcakes.

For the Frosting:
Butter, softened
½ tsp Vanilla Extract
Icing Sugar
Drinking Chocolate Powder (like sweetened Cocoa Powder)
Dash of Milk
Multi Coloured Sprinkles

I’m afraid I didn’t weigh or measure the ingredients for this …. I placed a few heaped tablespoons of butter into a glass bowl, added the Vanilla Extract & about ½ a box of sifted Icing Sugar (250 gm/1 cup or so ?) to this, along with 2-3 tablespoons of drinking chocolate powder and then I beat it well (again, by hand as I far prefer this method to the electric kind !), adding a dash of milk (rather than more butter !) to moisten it a little. I smothered it over the cupcakes & my daughter and I had great fun sprinkling the decorations over the top.

Monday, October 19, 2009

Apple Cake

The top photo shows the layer of apples placed on top of the cake batter before baking


The photo above shows the apples with a butter, sugar and cinnamon topping sprinkled over


This photo shows the finished cake, after baking

A delicious treat to serve with afternoon tea, or with custard for a tasty dessert – the choice is yours ! This Apple Cake is always a hit in our home …..

I use ‘Granny Smith’ apples for this, but you could also use ‘Golden Delicious’ – or even a mixture of the two. Alternatively, you could use tinned apples although I think that the texture of fresh apples works best for this recipe. I like to lightly blanch mine first to soften them a little and to prevent them from burning around the edges and drying out when baking -:


Apple Cake (adapted from the book ‘Anyone Can Bake’ published by ‘Standard Brands Incorporated’ – 1929)

Base:
2 cups Flour
3 tsp Baking Powder
2 tbsp brown Sugar
½ tsp Salt
4 tbsp Butter
1 Egg, beaten
2/3 cup Milk

Topping:
3 Apples (peeled, cored, cut into slices & boiled lightly in water for around 8 mins to soften – allow to cool before placing on cake)
1 tbsp Butter
¼ cup brown Sugar
2 tsp ground Cinnamon

Sift flour, baking powder, sugar & salt together. Rub in the butter. Add the beaten egg & milk and mix to form a soft dough. Spread the dough into a greased 21 cm (8 inch) round cake tin. (The dough will be fairly stuff & will resemble wet bread dough). Press the (cooled) apple slices into the dough and dot with the butter. Mix the sugar and cinnamon together & sprinkle liberally over the apple topping. Bake at 190’C/375’F/Gas Mark 5 for 40 to 45 minutes until a knife inserted in the centre of the cake comes out clean.

Sunday, September 13, 2009

Mum's Zimbabwean Fridge Cake

Although the ingredients for this Fridge Cake recipe are quite simple, I guarantee you that the flavour is quite the opposite !

A close up of the Fridge Cake in all it's rich, chocolatey deliciousness ... mmmmmm !


My Mum used to make this for my sister and I as children growing up in Zimbabwe (then Rhodesia). I also remember her making this for us when we were older and lived in the small village of Kwambonambi in South Africa. I guess as it originated in Zimbabwe, it was given the ‘Zimbabwe’ name and it just stuck.

The ingredients for this are so simple and usually found in everyone’s kitchen at any given time – in that regard, this recipe is easy to throw together if you need to make something in a hurry. It sets quite quickly, too and is great if you don’t have an oven, as it is made on the stovetop and sets in the fridge.

This would be great to serve at a child’s birthday party (or an adult's, for that matter !) and also goes well served with ice cream as a dessert. It’s very sweet and very rich and very high in calories – but hey, who’s counting ?!


Mum’s Zimbabwean Fridge Cake

1 x 200gm packet crushed Marie Biscuits (or Tea Biscuits)
125 gm Butter
2 tbsp Sugar
2 tbsp Syrup
2 tbsp Chocolate Drinking Powder (i.e. the sweetened type)
1 tbsp powdered Milk

Melt the butter, sugar, syrup, chocolate drinking powder and powdered milk together in a small saucepan. Blend well. Remove from the heat and stir in the crushed biscuits. Press into a lightly greased rectangular (26 cm x 16 cm) glass dish & refrigerate until set/hardened. Cut into small squares before serving.

Saturday, September 5, 2009

Chocolate & Vanilla Marble Loaf

This Chocolate & Vanilla Marble Loaf is great served with afternoon tea - or with hot custard (& sliced bananas, if you like !) as a tasty pudding

A deliciously tasty and simple recipe, this Chocolate & Vanilla Marble Loaf also freezes well – you could double the quantities below and make 2 loaves – one to eat ‘now’ and one to freeze.

I like serving this with tea, but my husband prefers his served with sliced bananas and hot custard as an after dinner pudding ;)

If you’re wondering why no photo’s of the slices exist – it’s because I forgot to take any and when I remembered, the loaf had been eaten !


Chocolate & Vanilla Marble Loaf

½ cup Butter
½ cup Sugar
3 Eggs
2 cups Flour
3 tsp Baking Powder
pinch of Salt
1 cup Milk
1 tsp Vanilla Essence
2 tbsp Hot Chocolate Powder dissolved in 2 tbsp Milk

Cream the butter & sugar together until light & fluffy, then add the eggs & continue to beat until blended. Add the sifted flour, baking powder & salt and then the milk and vanilla essence. Beat well. Pour into a 22,5 cm x 11,5 cm (9 inch x 4,5 inch) greased loaf tin. Gently pour the chocolate mixture down the middle (surface) of the loaf & cut through the batter in a zig zag motion to gently mix or ‘marble’ the chocolate mixture through the vanilla batter. Bake at 180’C/350’F/Gas Mark 4 for 45 to 60 minutes, until a skewer inserted into the middle of the loaf comes out clean.

Sunday, April 19, 2009

Step-By-Step Instructions On How To Make A Number 4 Birthday Cake

Well, considering that I made this birthday cake for my daughter when she turned 4 in December last year, it’s taken me quite a while to get around to posting it, hey ?!

As I will probably bake her (and her sister brother !) 2 cakes each year (one for school and one for her birthday party at home) I’m sure that I’ll slowly work my way through all the numbers, so here is the first number cake I ever made, a number 4.

The cake (batter) recipe is my own, but the method of assembling the cake comes from the popular book “The Australian Women’s Weekly - Kid’s Birthday Cakes” which I bought on Amazon last year. I do love Australian recipe books because their ingredients are quite similar to the ones we can get here in Africa, and their recipes also seem to be geared towards our hot climate.

Here is how you make it -:

Basic (Plain) Cake Batter


200 gm Margarine (or Butter)
1 1/2 cups Sugar
5 Eggs
3 cups Flour
4 tsps Baking Powder
2 cups Milk

Cream the margarine & sugar together. Add the eggs, beating well. Add the sifted flour and baking powder, then the milk. Beat all together until well mixed & pour into a greased 20 cm x 30 cm square cake tin. Bake at 190’C/375’F/Gas Mark 5 for 30 to 40 minutes until a knife inserted in the centre of the cake comes out clean. Allow to cool before removing from the tin.

How To Assemble The Cake: (taken from “Kid’s Birthday Cakes” by The Australian Women’s Weekly)

Using a serrated knife, level the cake top.

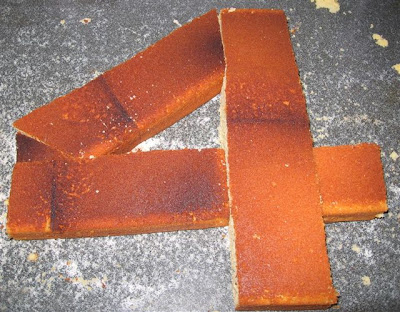
Place the cake cut-side down. Cut it into 3 even strips (of approximately 6,5 cm each) as shown below (I’ve used paper to illustrate this as I forgot to photograph this step with the actual cake) -:

Leave the centre strip whole, & cut the remaining strips into 3 segments each, as shown below -:

Now assemble the cake pieces, as shown below, to form a number 4 (discard the off cuts). During both my trial run & the time I made the actual cake, I had to trim the one section (middle section far left pictured in the photo above) slightly so that it fitted properly, but you can only do this once you’ve laid the no 4 out & can see for yourself exactly where it needs to be adjusted -:

This is what it looked like when assembled with the actual sponge, before icing -:
Now you can ice the cake any way you like. I used a simple icing made by mixing icing sugar & water together, which I coloured pale lilac with food colouring powder (my daughter’s colour scheme for the party was pink and lilac) & I then covered the cake with flowers made from cutting pink and white marshmallows into slices (with scissors dusted in icing sugar) and pinching the ends to form ‘petals’. I used purple coloured sweets (candy) to make the flower centres, & dusted the spaces with glittery lilac sugar (which my Mum brought for me from South Africa – thanks, Mum !)

(Roll on, no 5 which judging by the book, looks a bit easier to cut & assemble than no 4 !)

Tuesday, February 17, 2009

Spiced Apple & Banana Loaf

Packed with fruity flavour, this loaf also tastes great toasted the next day

We recently hosted some clients on the farm for a farm tour followed by afternoon tea, and this was one of the things which I served to them. It’s another of my own recipes, and also tastes great the next day toasted and served hot with a little butter. Mmmmm ……..!

Here’s the recipe -:


Spiced Apple & Banana Loaf

5 tbsp Margarine
1 cup brown Sugar
2 Eggs, beaten
2/3 cup Milk
1 ¾ cups Flour
3 tsp Baking Powder
1 tsp Cinnamon powder
½ tsp Nutmeg powder
1 cup grated Apple (about 2 Apples)
½ cup finely sliced Bananas (about 2 bananas)
Little Lemon Juice (optional)

Cream the margarine & sugar together. Add the beaten eggs and milk. Mix well. Add the sifted flour, baking powder, cinnamon & nutmeg powder and blend well. Stir in the apple & banana (sprinkle a little lemon juice over the fruit first, if you want to prevent browning). Pour into a lightly greased 22 cm x 13 cm loaf tin and bake at Gas Mark 5/190’C/375’F for +- 45 minutes until a knife inserted in the centre comes out clean. Allow to cool before turning out of the pan.

This loaf tastes great served warm with some butter.

Friday, December 5, 2008

Christmas Cupcakes for Kids

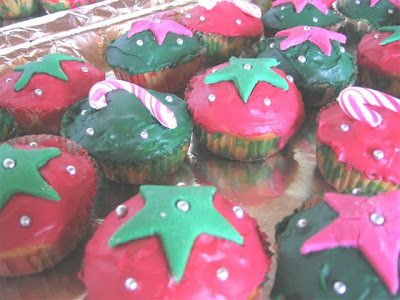
These Christmas cupcakes were a hit with the kids at my daughter's school concert last week

I decided to use dark red & green colours for a real Christmas feel

Last Friday my daughter performed in her first ever school concert, “The Littlest Christmas Tree”. She played the role of a child, part of a family group choosing the ‘perfect’ Christmas tree & she did so well & we were very proud of her ! (It was great that my parents were here for the concert, too – they specially timed their flights so as to be here in time for her ‘big day’!)

Anyway, after the concert the kids had a Christmas party and each set of parents was asked to bring a platter of eats. I wanted to make something really fun, colourful & Christmas-ey for the kids, and these Christmas cupcakes are what I came up with !

The highlight of the day was a visit by Father Christmas (who arrived in an old Landrover & a swirl of dust !) who had a present for each child. Afterwards my daughter whispered to me “He’s not the REAL Father Christmas, Mama – his beard was made of cottonwool & he wasn’t in a sleigh !” So I had to explain to her that as Father Christmas is extremely busy at this time of the year, he has several helpers all over the world who stand in for him for school functions etc. (I’m not sure if she bought my story, though !)

Here is the recipe, adapted from my ‘basic’ flop proof cake recipe which has been passed down to me by my mother, & is the only cake recipe I ever use -:


Christmas Cupcakes

200 gm’s Margarine
1 ½ cups Sugar
5 Eggs
3 cups Flour
4 level tsps Baking Powder
2 cups Milk

Cream the margarine & sugar together until light & fluffy. Add the eggs & beat well to blend. Sift in the flour & baking powder. Add the milk and beat until light & creamy. Place spoonfuls in greased cake cups & bake at 190’C/375’F/Gas Mark 5 for 20 to 30 minutes until done.

(Makes around 42 cupcakes).

How I iced them :

1 roll Ready Made Icing (similar to a ‘plastic’ type of icing, containing glycerine etc – mine was enough to cover a 23cm round cake)
Red & Green food colouring
Icing Sugar
Water
Edible silver balls
Mini peppermint candy canes (or any other decoration)

I took the roll of ready made icing & split it in two & coloured the one half with red food colouring, & the other half with green food colouring. I rolled both pieces until really flat & thin on a surface dusted with icing sugar & I then used a small star shaped cookie cutter to cut the star shapes out of each.

I set these aside to dry whilst mixing a 500 gm packet of icing sugar with tablespoon by tablespoon of water so as to form a very thick paste/icing sugar mix. I then coloured half of this with red & the other with green food colouring.

I iced half the cakes in the red icing and the other half in the green (dipping my knife into cold water as I went along, to make the icing more pliable) & before the icing started to harden, I placed a star on each (alternate colour e.g. red star on green icing) with an edible silver ball in the middle, & a few on the outside. I had some shop bought mini peppermint candy canes which I placed on the other cakes.

I iced these cupcakes the day before the function, you could make them up to 2 days before and keep them very dry as after 2 days they do begin to ‘melt’ a little and the colours tend to run a bit.

Monday, December 1, 2008

Marguerite Patten’s Rich Christmas Cake

The cake tin - lined with both greaseproof & brown paper (above). Preparing the tin is one of the most important parts of the process, as it prevents your cake from burning

The cake batter (above), in the prepared tin, just about ready to go into the oven

The Christmas cake once it is removed from the oven after it's long, slow baking process

Because we cannot buy Christmas cake here, I always make my own. This is a well known recipe of Marguerite Patten’s and although I feel it is always best to make it several weeks before you plan to eat it (I make mine around 5 – 6 weeks beforehand), the beauty of this recipe is that it can also just as easily be made a few days before Christmas, and it still tastes great !

Each week I unwrap my Christmas cake, prick it all over with a toothpick and then pour a few liberal tablespoons of brandy all over it (you can do it on both sides if you like). This helps to not only keep the cake moist, but to develop the richness of the flavours, too.

Several years ago, I decided to inject the syringe with brandy instead of simply pouring tablespoons of brandy over it – the first time I did this, there was complete silence from Justin (who was standing behind me in the kitchen, drying dishes at the time) as he watched me, awestruck and quite convinced that Mama had finally gone completely crazy ! ‘Mama ?’ he asked me ever so politely in Swahili, ‘Excuse me, but why are you giving that cake and injection ? Is it sick, or …. what is the reason for this ?” Well of course after explaining to him what I was doing he thought it quite funny too, although I must say that since that day I’ve rather stuck to the tablespoon method as less questions are asked when I do so !

(I will ice this cake quite close to Christmas day, and will do another blog post on it then. My family are not too fond of marzipan, so I use an alternative method to ice my cake.)

Marguerite Patten’s Rich Christmas Cake

350 gm plain white Flour
1 tsp ground Cinnamon (I made mine slightly heaped)
1 tsp mixed Spice (I made mine slightly heaped)
115 gm candied Peel, chopped
900 gm mixed dried Fruit (preferably 450 gm Currants, 225 gm Sultanas, 225 gm seedless Raisins)
50 – 115 gm blanched Almonds, chopped (I used 115 gm salted Cashew nuts – all I could find !)
115 gm red glace Cherries, chopped
4 large Eggs, whisked
4 tbsp Sherry or Brandy or Milk (I used 5 tbsp Brandy)
225 gm Butter (I used Margarine as no butter available here right now !)
finely grated zest of 1 lemon
finely grated zest of 1 orange (optional – I didn’t use as I didn’t have any)
225 gm Sugar, preferably dark moist brown sugar (I used plain brown sugar)
1 level tbsp Black Treacle or Golden Syrup (I used Treacle)

I used a 23 cm round cake tin for this (you could use a 20 cm square cake tin if you prefer a square cake). It is very important to prepare your tin carefully as the cake cooks for a long time & due to the high sugar/fruit content, you don’t want it to burn as the whole flavour cake will be ruined !

First I thickly grease the ‘naked’ cake tin with margarine (bottom & sides). Then I cut greaseproof paper to size – 2 discs for the bottom of the tin & 2 strips for the insides. I grease in between each disk/strip, finishing off with a layer of margarine on the outside of the paper (the inside part which the cake batter will be poured into). Then I cut a long strip of brown paper to wrap around the outside of the cake tin, 2 cm higher than the edge of the cake tin. This I tie securely to the tin with string.

Now for the mixing – don’t worry as this cake does not contain any raising agents (baking powder, baking soda etc) as this is how it should be -:

Sift together the flour, cinnamon & mixed spice. Mix together the candied peel, dried fruits, almonds and cherries (if these are slightly sticky, toss them lightly in some flour). Whisk the eggs with the sherry/brandy/rum or milk (whichever one you’ve opted to use). Cream the butter together with the lemon and orange zest (if using), sugar and treacle (or golden syrup) until soft. (Be careful not to over beat the batter, as this type of cake does not need much aerating.)

Gradually blend in the egg mixture and sifted dry ingredients. Stir in all the fruit. Spoon the mixture into the tin, smooth it flat on top, then press the top with slightly damp knuckles, as this helps to keep the cake moist and flat.

Bake in the centre of an oven pre heated to 160’C/325’F/Gas Mark 3 one hour, then lower the heat to 150’C/300F/Gas Mark 2 for another +_ 2 ½ hours. (Baking times for rich fruit cakes like this vary considerably according to your particular oven, so test it carefully.)

To test the cake: first press firmly on top - there should be no impression - then check to see if the cake has shrunk away from the sides of the tin. If it has, remove from the oven & listen carefully. A rich fruit cake that is not quite cooked gives a definite humming noise, in which case return it to the oven for a short time and test again. Cool the cake in the baking tin, when completely cold turn it out carefully, wrap in foil and store in an airtight tin.

(I usually make this cake around a month or so before Christmas, & once a week I remove it from the foil, prick it all over with a toothpick, & pour a few tablespoons of brandy over it before wrapping it up & returning it to the tin again. This helps to keep the cake moist & the brandy seems to mature it & give it an even deeper/richer flavour. You don’t have to do this however, as the cake tastes just as nice without the extra brandy ‘baths’ !)

Saturday, October 4, 2008

Victoria Sandwich Cake

This Victoria Sandwich Cake is light, fluffy ...... & delicious served with afternoon tea !

Fresh out of the oven, sandwiched together with tangy strawberry jam .... now all it needs is a nice cuppa tea .... mmmm

Victoria Sandwich Cakes always remind me of an old fashioned treat. The original recipe and origins of the cake date back to England in the 1800's - so I'm not surprised !

They are a great cake to make when you have no icing sugar in the house, because a simple dusting of sugar and a bit of jam is all that is needed to make them both pretty and tasty.

Last weekend my husband said he felt like a “vanilla type cake” and asked if I’d make him one (“pleeeeeze !”) Well, of course I jumped at the chance (not that I need an excuse) because you know how much I love baking ! I had not made this recipe for some time, but it was still just as good as I remembered it.

As luck would have it, I had this cake to serve with tea the following day when we had an unexpected visitor on the farm – needless to say, it was finished by that night !


Victoria Sandwich Cake (from “Cooking For Everyone” by “Good Housekeeping”)

175 gm Butter
175 gm Caster Sugar (very fine sugar)
3 Eggs, beaten
175 gm self-raising Flour
2 tbsp Jam (I use Strawberry)
Caster Sugar, to dredge

Butter two 18 cm sandwich tins & line the base of each with a round of buttered greaseproof paper. Beat the butter and sugar together until pale & fluffy. Add the eggs a little at a time, beating well after each addition. Fold in half the flour, using a metal spoon, then fold in the rest.

Place half the mixture in each tin and level with a knife. Bake in the oven at 190’C/375’F/Gas Mark 5 for about 20 minutes, until they are risen, firm to the touch & beginning to shrink away from the sides of the tins. Turn out & cool on a wire rack.

When the cakes are cool, sandwich them together with the jam & sprinkle the top with caster sugar.

Sunday, September 28, 2008

Sticky & Sweet, A Real Treat .... Homemade Gingerbread

This Gingerbread is delicious served hot out of the oven with lashings of butter .... mmmmmm !

Here is the Gingerbread recipe I made recently for our visitors from Japan. It’s a South African recipe from one of my favourite cook books “Cook and Enjoy It” by S.J.A. de Villiers.

I liked to serve it still warm from the oven with lashings of butter. It is also great toasted, a few days after you’ve made it (if it lasts that long !) and also freezes well.

I first used this recipe years ago when I realized we had visitors coming for tea & I had no eggs in the house ! So it’s also great for people who cannot eat eggs. You can also make ginger muffins with the batter – follow the recipe and simply pour the batter into greased muffin cups and bake for 15 to 20 minutes until done.

The batter is quite runny, but don’t worry it’s supposed to be like this and results in a dense, moist loaf … mmmmmm …..


Gingerbread (from the South African book “Cook and Enjoy It” by S.J.A. de Villiers)

½ cup Sugar
½ cup golden Syrup
½ cup Butter or Margarine
½ cup boiling Water
2 cups cake Flour
2 tsp ground Ginger
2 tsp ground Cinnamon
pinch of salt
1 tsp Bicarbonate of Soda
1 tbsp hot Water

Preheat the oven to Gas Mark 4/180’C/350’F. Line a small greased loaf tin with baking paper or greased brown paper.

Place the sugar in a measuring cup & add the syrup. Place the butter in another measuring cup & add the boiling water. Combine the two mixtures and mix well. Sift together the cake flour, ginger, cinnamon & salt and add to the butter mixture. Mix well. Dissolve the bicarbonate of soda in the 1 tbsp hot water & stir into the batter. Turn the batter into the tin & bake for 45 minutes.

Wednesday, July 9, 2008

Strawberry Swiss Roll

This swiss roll is also delicious with an apricot or blackberry jam filling

When I was in High School, I took Home Economics as a subject. I really loved it. In fact, it was my absolute favourite subject, especially when we got to cook and bake in the class kitchen.

For my practical exam in matric (final year of high school/senior school) I chose to cook a wedding breakfast which included, amongst other things, both plain and cheese croissants made from scratch. Whenever I make croissants now, it always takes me right back to my school days spent in the Home Economics kitchen.

Anyway, this Swiss Roll recipe is one I was taught during one of those Home Economics classes almost 20 years ago (!!) and which I still make today. Granted, it is a bit of a fiddly recipe …. but it is well worth the effort, I promise you !


Strawberry Swiss Roll

250 ml Flour
10 ml Baking Powder
Pinch of Salt
4 Eggs
200 ml Castor Sugar
12,5 ml lemon Juice
25 ml cold Water
Strawberry Jam (for filling)
Extra Castor Sugar (for dusting)

Firstly, prepare a Swiss roll tin by oiling it and then placing a sheet of wax paper inside it and then oiling the surface of the wax paper, too (so, you will have oil on both sides of the paper).

Then beat the eggs until light & foamy. Add the lemon juice & water and continue beating. Gradually add the castor sugar, beating after each addition. When well mixed, sieve the flour, baking powder and salt twice before folding them in to the egg mixture. Now pour the mixture into the prepared Swiss roll tin. Gently drop the tin a few times on the counter top to get rid of any air bubbles in the batter.

Bake at Gas Mark 5 / 190‘C/375’F for 10 to 15 minutes until lightly golden and springy to the touch.

Once done, turn out immediately onto a wet tea towel which has been sprinkled with Castor sugar & then spread jam over the entire surface (if the edges of the Swiss roll are crispy, you can thinly slice them off). Using the tea towel, roll up the sponge until a roll is formed.

Tuesday, May 27, 2008

Lynda's Luscious Lemon Loaf

Tasty, tangy and moist, we enjoyed this with a nice cup of tea ...


Following on from my post on Sunday about the glut of lemons I have at the moment, I decided to make a Lemon Loaf this weekend.

This is one of my own recipes - it is a nice moist loaf with a tangy lemony flavour, accentuated by the addition of the lemon icing (although you could use water in place of the lemon juice and just keep the icing plain if you prefer).

Lemon cakes and loaves are not that common here in Africa … I mean, you do not often see them in shops, bakeries or on restaurant menus or even in people’s homes, for that matter. I’m not sure why ? But anyway, it is a loaf I sometimes like to make for tea when we have visitors as it is slightly ‘unusual’ here, and always gets rave reviews !

I had just iced the loaf and was waiting for the icing to set slightly before I sprinkled the grated lemon rind on the top, when I caught my husband brandishing a knife “Can I just have a little taste off the end ?” he asked me “NO ! DON’T YOU DARE !!!” I shouted at him “I haven’t taken a photo of it yet !” My poor husband eventually got to eat a piece (he likes the crusty end pieces slathered in - wait for it - peanut butter !) about 5 seconds after I’d taken the photo !


Lynda’s Luscious Lemon Loaf

125 gm Margarine
150 gm brown Sugar
2 tbsp finely grated Lemon rind
4 tbsp Lemon juice
2 Eggs, beaten
¼ cup Milk
175 gm Flour
1 tsp Baking Powder
pinch of Salt

For the icing :

130 gm Icing Sugar
3 – 4 tbsp Lemon juice
1 tsp finely grated Lemon rind

Cream the margarine & sugar together. Add the lemon rind & juice, and continue to beat. Add the beaten eggs & milk and mix and then fold in the sifted flour, baking powder and salt. Blend well together and pour into a greased loaf tin. Bake at 190’C/375’F/Gas Mark 5 for 40 - 45 minutes until a skewer inserted into the middle of the loaf comes out clean. Set aside to cool.

Meanwhile, mix the lemon juice, rind and icing sugar together and once the loaf is cool, pour it over the top and smooth with a knife. (You can keep a little of the finely grated lemon rind back, and sprinkle it over the surface if you like.)

Thursday, May 15, 2008

An Easy Chocolate Cake Recipe

I iced the Chocolate Cake with some simple butter icing and garnished it with red cherries (very 'seventies' don't you think ?!)

In yesterday’s post I wrote how I’d baked a Chocolate Cake for afternoon tea. So today, I thought I would post the recipe, and a photo of yesterday’s cake !

This is a “basic” cake mixture recipe which I’ve used for years, and also used (adapted) when I recently made cupcakes with my toddler (you can see the recipe and photo here).

I made the cake in a single layer, but you could easily pour the batter in to 2 smaller cake tins and sandwich the layers together with jam before icing, if you prefer.

It’s a great, quick, easy and fail-proof recipe that has never let me down -:


Easy Chocolate Cake

100 gm Margarine
¾ cup Sugar
3 Eggs, beaten
1 ½ cups Flour
½ cup Cocoa Powder
2 tsp Baking Powder
¾ cup Milk

Cream the margarine & sugar together until light and fluffy. Add the eggs and beat well. Sift the flour, cocoa powder and baking powder into the mixture. Add the milk.

Pour into 2 greased cake tins and bake at 180’C/’F/Gas Mark 4 for 20 to 30 minutes.